Time-based call routing allows you to determine where calls route based on when the call comes in. This can be useful for setting up after-hours greetings, holiday greetings, lines that point to shift/duty phones, or temporary closures. While most help articles have parts you can skip, it is highly recommended to read this article in full prior to making any changes. Failure to do so can result in your phones not working. As such, this article has been kept as streamlined as possible out of respect for your time.
Prerequisites
The first thing you will need to do in order to configure time-based routing is to create some timeframes. To create a timeframe, please consult our guide on timeframes.
For demonstration purposes, these are the timeframes on the example system: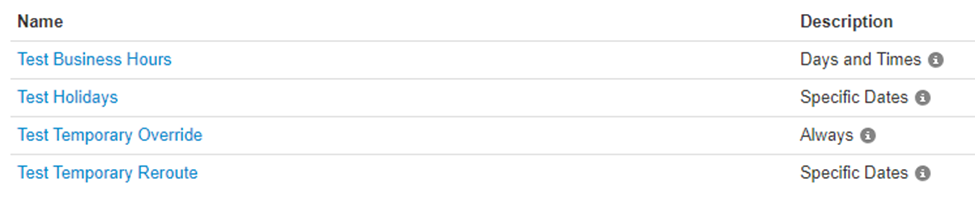
Test Business Hours is 9AM to 5PM every day of the work week, excluding weekends.
Test Holidays is set for all day on December 25th
Test Temporary Reroute is set to run all day July 1st, 1999 – more on this in “Configuring Timeframes”
Test Temporary Override will not be used, please disregard it
Please note that it is not necessary to create an afterhours timeframe. Time-based routing automatically creates a Default timeframe for any calls not defined by your timeframes to route to.
Getting Started
Log into the portal and select “Inventory”. You should be presented with a list of phone numbers on your account. Select the number you wish to modify and you will be presented with a screen similar to the following:
Change “Enable Time Frames” in the upper left corner to “Yes” by clicking on the switch. The screen should then immediately change.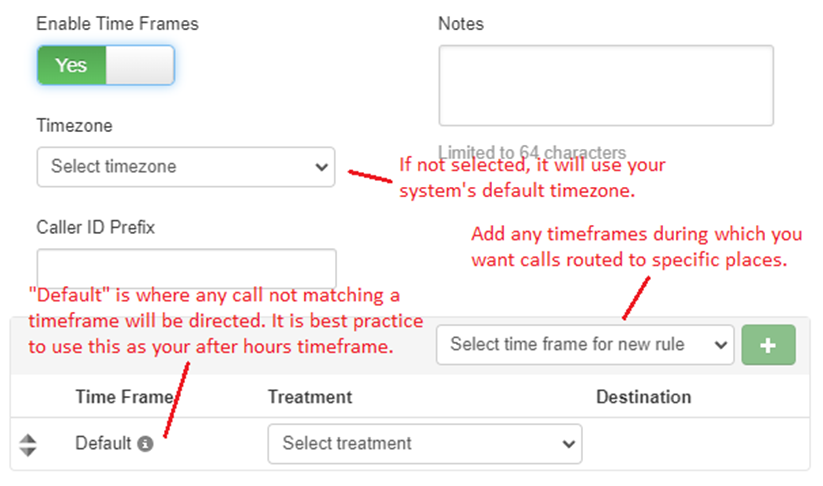
Logic
- The system is essentially checking the date and time whenever a phone call comes in and comparing that to the specified timeframes listed in the phone number’s Inventory page. If it’s a match, it follows that route. If it does not match, it keeps going down the list until it matches with something or hits the Default route.
- Timeframes are always read from top to bottom, so it is recommended you place the less frequent timeframes towards the top.
- You can reorder these timeframes by clicking and dragging on the up/down arrows on the far left.
- You can check to see that dates are covered by a timeframe by hovering your cursor over the circled “i” symbol that corresponds with the timeframe you want to check.
- The Default timeframe always goes at the bottom, as it is a catch-all for any calls not defined by other timeframes. Because of this, we can use it as an after-hours option without having to define a messy afterhours timeframe.
- In the example above, a Temporary Reroute timeframe was deliberately set for a past year and placed at the top in the inventory screen. Doing this allows you to adjust the timeframe on an as-needed basis and have it route to a predefined destination without having to set it in the inventory. This is entirely optional and most users will have no need for it.